Hearing Aid Maintenance Tips For Longevity
Extend the life of your hearing aids with essential cleaning and maintenance tips. Learn how to care for your devices properly for optimal performance.
Hearing Aid Maintenance Tips For Longevity
Extend the life of your hearing aids with essential cleaning and maintenance tips. Learn how to care for your devices properly for optimal performance.Hey there, hearing aid users! We all know that investing in hearing aids is a big step towards better hearing and an improved quality of life. But just like any other valuable electronic device, your hearing aids need a little TLC to keep them running smoothly and performing their best. Proper maintenance isn't just about keeping them clean; it's about ensuring their longevity, preventing costly repairs, and getting the most out of your investment. Think of it as giving your ears the VIP treatment they deserve!
In this comprehensive guide, we're going to dive deep into everything you need to know about hearing aid care. We'll cover daily cleaning routines, weekly checks, and even some advanced tips for specific types of hearing aids. We'll also talk about common issues you might encounter and how to troubleshoot them, plus when it's time to call in the pros. So, grab your cleaning tools, and let's get started on making your hearing aids last!
Daily Hearing Aid Cleaning Essentials Your Everyday Routine
Your hearing aids are exposed to earwax, moisture, and skin oils every single day. A quick daily clean can prevent buildup that might block sound or damage components. It's super easy and only takes a few minutes!
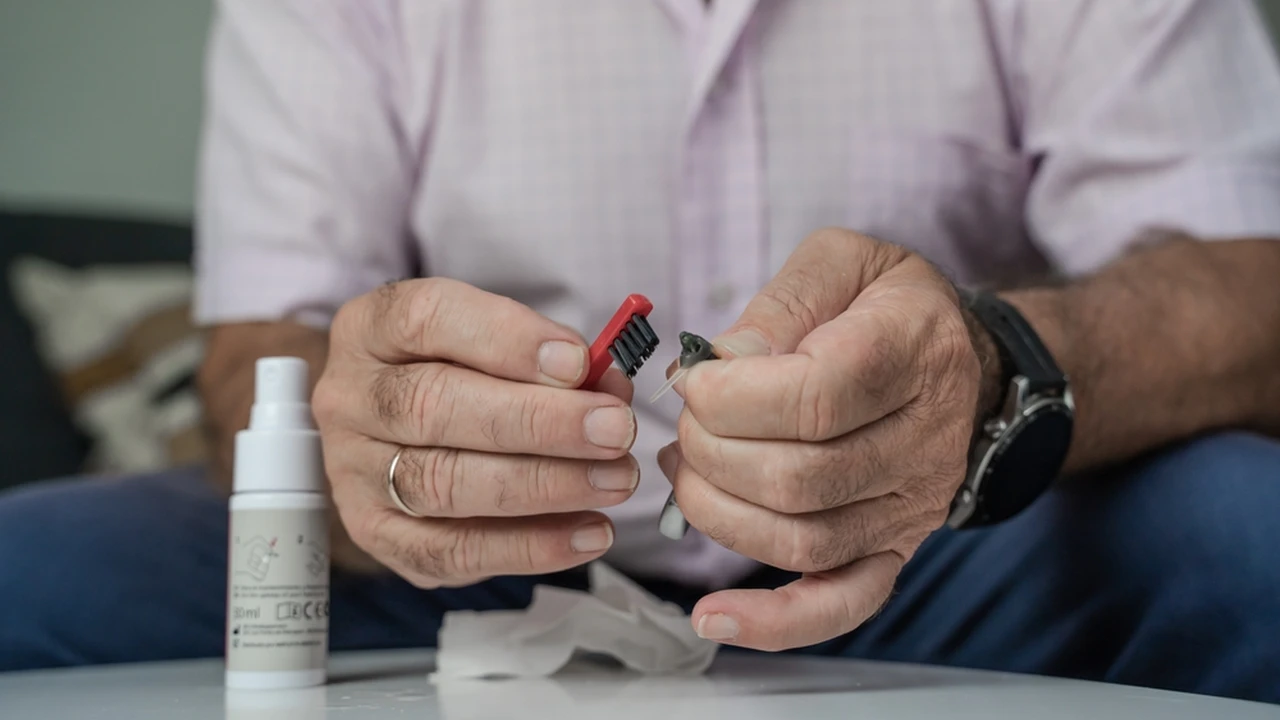
Wipe Down Your Hearing Aids Gentle Cleaning Techniques
First things first, always wash your hands thoroughly before handling your hearing aids. This prevents transferring dirt and oils from your hands to the devices. Once your hands are clean, gently wipe down the entire surface of your hearing aids with a soft, dry cloth or a specialized hearing aid cleaning wipe. Pay extra attention to the parts that come into contact with your skin, like the shell of an in-the-ear (ITE) device or the casing of a behind-the-ear (BTE) model.
Cleaning Hearing Aid Earmolds and Domes Preventing Wax Buildup
For BTE and receiver-in-canal (RIC) hearing aids, the earmold or dome is crucial for sound delivery. These parts are most susceptible to earwax buildup. Use the small brush or wax pick that came with your hearing aid cleaning kit to gently clear any visible wax from the sound port and vents. Be careful not to push the wax further into the device. If you have a removable earmold, you might be able to detach it and wash it in warm, soapy water, but always check your manufacturer's instructions first. Make sure it's completely dry before reattaching it to the hearing aid.
Checking Hearing Aid Batteries Powering Your Devices
While not strictly a cleaning task, checking your batteries daily is a vital part of your routine. Open the battery door at night to allow air to circulate and prevent moisture buildup, which can extend battery life. If you use disposable batteries, check their charge. If you have rechargeable hearing aids, ensure they are placed on their charger every night so they're ready for the next day.
Weekly Hearing Aid Maintenance Deeper Cleaning and Inspections
Once a week, it's a good idea to perform a slightly more thorough check and clean. This helps catch any potential issues before they become bigger problems.
Inspecting Hearing Aid Tubing and Wires Ensuring Clear Sound
For BTE hearing aids, the tubing that connects the hearing aid to the earmold can become stiff, discolored, or cracked over time. Gently inspect the tubing for any signs of wear and tear. If it's stiff, discolored, or has cracks, it might be time for a replacement. Your audiologist can usually do this quickly and easily. For RIC hearing aids, check the thin wire that connects the main unit to the receiver in your ear. Ensure it's not kinked or damaged.
Cleaning Hearing Aid Vents and Microphones Optimizing Performance
Use the small brush or wax pick to carefully clean any vents on your hearing aid. These vents help with air circulation and can also get clogged with wax. Also, gently brush around the microphone ports. These tiny openings are where sound enters your hearing aid, and if they're blocked, your sound quality will suffer. Again, be gentle and avoid pushing debris further in.
Moisture Control For Hearing Aids Protecting From Humidity
Moisture is the enemy of electronics, and hearing aids are no exception. Even if you don't live in a humid climate, sweat and condensation can build up. A hearing aid dehumidifier or drying kit is a fantastic investment. These usually come in two forms: a simple drying jar with desiccant capsules or an electronic drying station that uses gentle heat and/or UV light. Place your hearing aids in the drying kit overnight once a week, or more often if you're particularly active or live in a very humid area. This helps draw out any internal moisture and keeps the components dry.
Advanced Hearing Aid Care Tips Maximizing Longevity
Beyond the daily and weekly routines, there are some extra steps you can take to ensure your hearing aids have a long and happy life.
Proper Hearing Aid Storage Keeping Them Safe
When you're not wearing your hearing aids, store them in a safe, dry place. The original case they came in is usually ideal. Avoid leaving them in direct sunlight, near heat sources (like a radiator or stove), or in a bathroom where humidity can be high. Also, keep them out of reach of pets and small children, who might mistake them for toys or snacks!
Avoiding Water Damage Protecting Your Investment
This might seem obvious, but it's worth repeating: hearing aids and water do not mix! Always remove your hearing aids before showering, swimming, or using a sauna or steam room. If you get caught in the rain, try to protect them as much as possible. If they do get wet, remove the batteries immediately (if applicable), wipe them dry, and place them in a drying kit for at least 24 hours. Do not use a hairdryer or microwave to dry them, as extreme heat can cause irreparable damage.
Handling Hearing Aids With Care Gentle Is Key
Hearing aids are delicate instruments. Always handle them over a soft surface, like a towel, to cushion them if they accidentally drop. When inserting or removing them, use a gentle touch. Avoid forcing them into your ear or pulling them out roughly. If you're struggling with insertion or removal, ask your audiologist for a demonstration.
Regular Professional Checkups The Audiologist's Role
Even with the best home care, regular visits to your audiologist are essential. They have specialized tools and expertise to perform deeper cleaning, check for internal issues, and make any necessary adjustments. Most audiologists recommend a checkup every 6-12 months. They can also replace tubing, domes, or wax guards, and ensure your hearing aids are still programmed optimally for your hearing needs.
Troubleshooting Common Hearing Aid Issues Quick Fixes
Sometimes, your hearing aids might not seem to be working quite right. Before you panic or schedule an immediate appointment, try these common troubleshooting steps.
No Sound or Weak Sound Diagnosing the Problem
If your hearing aid isn't producing any sound or the sound is very weak, here's what to check:
- Battery: Is the battery dead? Replace it with a fresh one. For rechargeable aids, ensure it's fully charged.
- Battery Door: Is the battery door fully closed? Sometimes it can be slightly ajar.
- Wax Buildup: Is the sound port or earmold/dome clogged with earwax? Clean it thoroughly.
- Tubing/Wire: Is the tubing on a BTE aid kinked, cracked, or detached? Is the RIC wire damaged?
- Moisture: Could moisture be interfering? Place the hearing aid in a drying kit.
- Volume: Is the volume turned down too low? Adjust it.
- Program: Is it on the correct program setting? Sometimes it might accidentally switch.
Hearing Aid Feedback or Whistling Solving the Annoying Sound
That annoying whistling sound, known as feedback, is usually caused by sound leaking out of your ear and being picked up by the microphone, then re-amplified. Here's how to address it:
- Improper Fit: Is your earmold or dome inserted correctly and snugly? A loose fit is a common cause.
- Earwax: Is there a buildup of earwax in your ear canal? This can block the sound from going into your ear, causing it to leak out.
- Volume Too High: Is the volume set too high? Try lowering it slightly.
- Cracked Tubing: For BTE aids, check if the tubing is cracked or stiff, allowing sound to escape.
- Microphone Proximity: Are you holding something too close to your ear, like a phone or hand, which might be causing the sound to reflect back?
Intermittent Sound or Static Addressing Connectivity Issues
If your hearing aid sound cuts in and out, or you hear static, consider these points:
- Battery Connection: Is the battery making good contact? Sometimes a slightly corroded battery or battery compartment can cause issues.
- Moisture: Again, moisture can cause intermittent problems. Use a drying kit.
- Damage: Is there any visible damage to the casing, wires, or tubing?
- Wax Guard: For RIC and some ITE aids, the wax guard (a tiny filter over the receiver) can become clogged, leading to intermittent sound. Replace it if necessary.
Recommended Hearing Aid Cleaning Products and Tools Your Essential Kit
Having the right tools makes maintenance much easier and more effective. Here are some must-haves for your hearing aid care kit:
Specialized Hearing Aid Brushes and Wax Picks Essential Cleaning Tools
Most hearing aids come with a small brush and wax pick. These are specifically designed to gently remove wax and debris from the tiny crevices of your device. If you've lost yours, your audiologist can provide replacements, or you can find universal kits online. Look for brushes with soft bristles and picks that are not too sharp to avoid damaging the delicate components.
Hearing Aid Cleaning Wipes and Sprays Gentle and Effective Solutions
Alcohol-free cleaning wipes or sprays are excellent for sanitizing the outer surfaces of your hearing aids. They help remove oils and germs without damaging the plastic. Always ensure any spray is applied to a cloth first, not directly onto the hearing aid, and that the product is specifically designed for hearing aids.
Hearing Aid Dehumidifiers and Drying Kits Protecting From Moisture
As mentioned, a dehumidifier is a game-changer for hearing aid longevity. Here are a few popular options:
- Dry & Store Global II: This is a popular electronic drying station that uses gentle heat and a fan to remove moisture. It also often includes a UV-C light to sanitize the hearing aids, killing germs and bacteria. It's a bit of an investment, usually ranging from $100-$150 USD, but it's highly effective for all types of hearing aids, including rechargeable ones.
- PerfectDry Lux: Another excellent electronic dryer, often more compact than the Dry & Store. It also uses forced air convection drying and UV-C light. Priced around $80-$120 USD, it's a great option for daily use and travel.
- Zephyr by Dry & Store: A smaller, more travel-friendly electronic dryer, typically around $60-$90 USD. It offers effective drying without the UV-C light, making it a good basic electronic option.
- Desiccant Drying Jars (e.g., Hal-Hen Super Dri-Aid): These are non-electronic, budget-friendly options. You place your hearing aids in a jar with desiccant capsules (silica gel) overnight. The capsules absorb moisture and need to be replaced periodically (usually every 1-2 months). A jar and a pack of capsules might cost around $15-$30 USD initially, with replacement capsules costing about $10-$15 USD for a multi-pack. These are great for occasional use or as a backup.
Comparison: Electronic dryers offer more consistent and thorough drying, often with added sanitization. They are more expensive upfront but have no recurring costs for consumables. Desiccant jars are cheaper initially but require ongoing purchase of capsules. For daily, robust moisture control, an electronic dryer is generally recommended, especially in humid climates or for active individuals.
Wax Guards and Filters Preventing Blockages
Many RIC and custom ITE/ITC/CIC hearing aids use tiny wax guards or filters to protect the receiver from earwax. These need to be replaced regularly, usually every few weeks or months, depending on your earwax production. Your audiologist will show you how to do this, and you can purchase replacement packs (e.g., CeruStop, HF4, HF3) from them or online. A pack of 8-10 wax guards typically costs around $5-$15 USD.
Specific Care for Different Hearing Aid Types Tailored Maintenance
While many maintenance tips apply universally, some types of hearing aids have specific care needs.
Behind The Ear BTE Hearing Aid Care Tubing and Earmolds
BTE hearing aids are generally quite robust. The main focus for BTEs is the tubing and earmold. As mentioned, regularly check the tubing for stiffness or cracks. If your earmold is detachable, you can clean it more thoroughly. After detaching, you can wash the earmold in warm, soapy water, rinse it well, and let it air dry completely overnight before reattaching. Make sure no water gets into the tubing or the hearing aid itself.
Receiver In Canal RIC Hearing Aid Care Delicate Wires and Domes
RIC hearing aids have a thin wire connecting the main unit to the receiver in the ear canal, often covered by a small dome. Be very gentle with this wire, as it can be delicate. Regularly clean the dome and replace it if it becomes stiff, discolored, or damaged. The wax guard on the receiver is also crucial for RICs; ensure it's clear of wax and replace it when needed.
In The Ear ITE ITC CIC Hearing Aid Care Custom Fit and Wax Guards
Custom-made ITE, ITC, and CIC hearing aids fit snugly in your ear canal. Their main vulnerability is earwax and moisture. Daily wiping and cleaning of the sound port and vents with a brush/pick are essential. Many of these also have wax guards that need regular replacement. Because they sit deeper in the ear, they are more exposed to earwax, so diligent cleaning is key.
When To Seek Professional Hearing Aid Help Don't Hesitate
Sometimes, despite your best efforts, your hearing aids might still not be working correctly. That's when it's time to call your audiologist or hearing care professional.
Persistent Issues When Home Remedies Aren't Enough
If you've tried all the troubleshooting steps and your hearing aid still isn't functioning properly (e.g., no sound, persistent feedback, distorted sound), it's likely an internal issue that requires professional attention. Don't try to open up your hearing aid yourself, as this can void warranties and cause further damage.
Physical Damage Accidents Happen
If your hearing aid has been dropped, stepped on, or exposed to significant water, it's best to have it checked by a professional, even if it seems to be working. There might be internal damage that isn't immediately apparent but could lead to problems down the line.
Changes in Hearing Your Ears Evolve
If you notice a change in your hearing, even with your hearing aids, it's important to schedule an appointment. Your hearing loss might have changed, and your hearing aids may need to be re-programmed or adjusted to ensure they are still providing optimal amplification for your current needs.
Regular Maintenance and Adjustments Keeping Up To Date
Remember those regular checkups? They're not just for cleaning; they're also for ensuring your hearing aids are perfectly tuned to your ears and lifestyle. Your audiologist can perform fine-tuning adjustments, update firmware, and provide the latest accessories or advice.
Taking good care of your hearing aids is a small effort that yields huge rewards. By following these maintenance tips, you're not just extending the life of your devices; you're ensuring consistent, clear hearing, which means better communication, more confidence, and a richer experience of the world around you. So, make these routines a habit, and enjoy the benefits of well-maintained hearing aids for years to come!
:max_bytes(150000):strip_icc()/277019-baked-pork-chops-with-cream-of-mushroom-soup-DDMFS-beauty-4x3-BG-7505-5762b731cf30447d9cbbbbbf387beafa.jpg)